Fixing the Queen Anne Rowhouse’s wallpaper requires installing two new lights, which always has the potential to go horribly wrong. The Rowhouse is wired with tapewire, and all of the lights are attached with brads to the tape underneath the house. There are also two outlets plugged into the tapewire, in the two bedrooms.
On the second floor, I used a 1:12 Scalloped Shade Ceiling Lamp with the wire running under a false ceiling, behind the wallpaper, and through a hole in the floor under the staircase. Because of the big open space next to the staircase, I didn’t have to drill a hole between the two stories.
(Before removing the plug to install this, I plugged it into the outlet in my bar roombox to make sure it worked. It did — but my hand bumped and broke the strawberry margarita glass in the process. Not a good omen.)
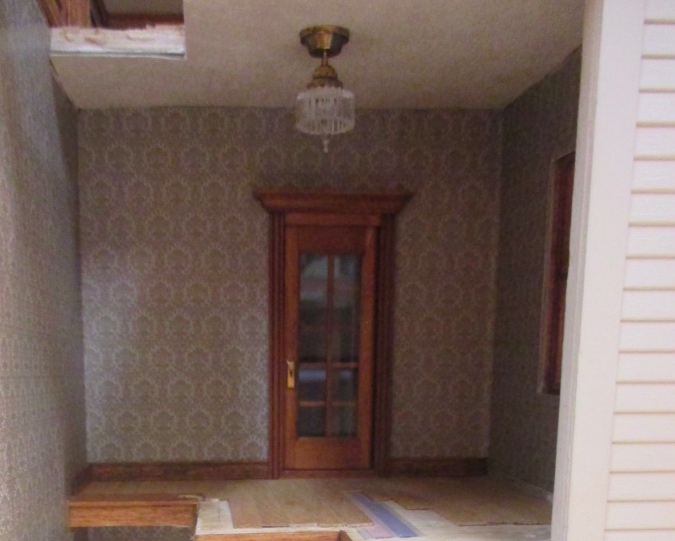
On the first floor, I decided to add a sconce to the staircase wall, with the wire again going through floor under the stairs.
I bought a 1:24 globe sconce, which has mysteriously disappeared from Miniatures.com’s website in the weeks since I bought it. It’s the same as the sconces I used on the bar. I bought this not because I wanted that style, but because I planned to replace the globe with the cranberry shade from the lamp that was previously hanging from the second floor staircase. I tested the shade on one of the bar lights, and it fit, and looked pretty cool. (But I didn’t take a picture, and I’m not going to now, lest I break something else in there!)
Unfortunately the shade didn’t fit on the new globe sconce — it got stuck one turn in, like the threads didn’t line up. I didn’t want to force it and end up with the shade stuck on the lamp, which won’t do me any good if I ever need to change the bulb. But I didn’t want to use the plain globe, either, so I ended up taking the shade off a Frosted Shade Oil Lamp that I’d planned to put in the bedroom. You’ll see a picture of it below.
But first! Before removing the plug and attaching it to the stairs, I plugged the sconce into the outlet in the Rowhouse’s bedroom to make sure it worked. The last time I turned on the lights in the Rowhouse was before I moved, more than two years ago. I was also using a new transformer for the first time. What could go wrong?
When I turned on the lights, they lit up, but the transformer hummed. Hmm. I unplugged it and plugged it in again. The humming was louder. I unplugged it and started to go upstairs and Google “what makes a transformer hum” when it occurred to me I should unplug the lead-in wire from under the house, since the house was precariously perched on the edge of the desk (so the lead-in wire would hang over the edge of the desk and not be smooshed by the house’s foundation). I tipped the house back so I could reach under to unplug it and SMOKE came billowing out.
And then I saw this:

OH MY GOD MY HOUSE CAUGHT ON FIRE!!!!!
Luckily, this wire was one of the lights that had to be broken to fix the wallpaper, so I’d been planning to disconnect it anyway. (I should have done that before I turned it on!) Double luckily, it wasn’t near any other wires, so nothing else got damaged. Still, it freaked me out. The opposite wires must have been touching each other, which means the insulation around the wires got damaged or broke down somehow.

Something similar happened when I first started electrifying this house, but it didn’t progress as far because I actually saw the smoke (this time it was trapped under the house). I thought the solution was to never use Cir-Kit lights and only use Houseworks lights, which appeared to have beefier insulation on the wires. But the one that burned up this time was a Houseworks light.
Because this happened, I’ve decided that the tangled rat’s nest of wires under the house is tempting fate, and I need to do something about it. I had left the wires long in case the connections failed and needed to be redone — inserting the brads tends to take me two or three tries and I was paranoid about running out of wire. The very first time I electrified a dollhouse (in 2002 or so), someone at the dollhouse store talked me into doing it with brads pounded into the tape wire rather than plugs and outlets. I’ve since learned that brads are a pain in the ass to install, and may fail, and plugs and outlets are much easier.
So I’m going to put plugs on all these wires, shortening the wires so they’re less likely to get damaged, and add outlets to the bottom of the house, and cross my fingers that nothing like this ever happens again. At least now I know what a humming transformer means. (The humming was the circuit breaker kicking in because of the shorted wire.)
Okay. Sorry for that long wordy digression, but I thought it was important. On to the stair sconce! I drilled a hole to run the wire through.

Then I glued on the sconce. I love how it looks with this shade. In some of the half scale lights, the bulbs stick up over the top of the shade and look silly (like this). But this shade is tall enough to hide the bulb and I think it looks prettier and more Victorian than the plain globe would have.

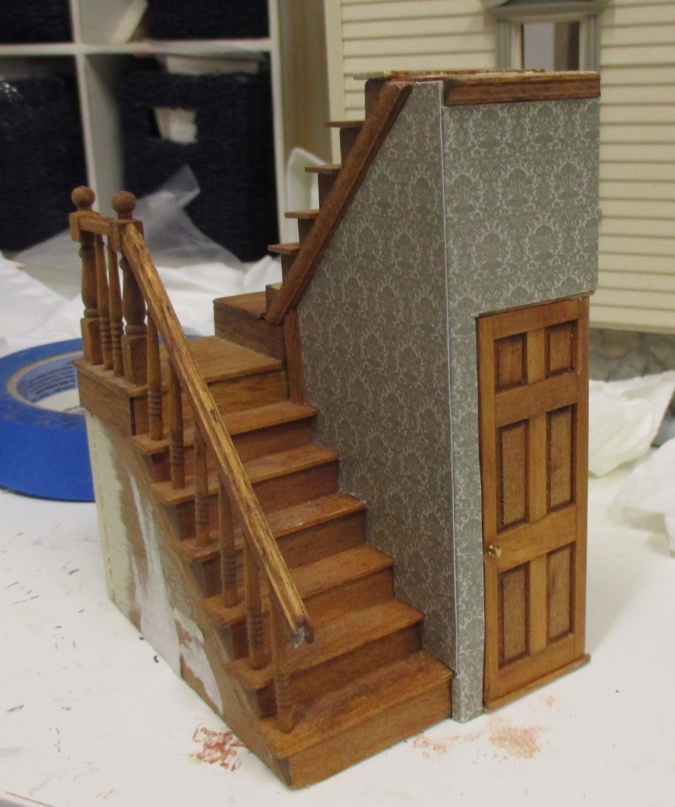
I also added quarter round to the edges of the stairs. This is partly to cover up that the wallpaper wasn’t perfect over a few of the steps, and partly because the staircase isn’t square and some of the upper steps aren’t flush with the wall, and I needed a way to fill those gaps. I’ll get into that in my next post.

Say goodbye to the closet door — once the stairs are in we’ll literally never see it again!

Next I pulled the sconce wire through the hole in the floor, leaving a little slack so it wouldn’t get pulled taut as I slid in the stairs.

Then I slid in the staircase for the last time, being careful not to snag the wire on the bottom of the stairs. These stairs are such a snug fit, I didn’t bother putting any glue on the side or bottom of the staircase. I did add glue to the top where it attaches to the ceiling but it’s almost gratuitous.

I wanted to attach the new wires before the glue on the top step dried too much, just in case something had gone wrong with the sconce while I was installing it. (That ship had sailed on the upstairs light — I guess I should have tested that before I wallpapered. Living dangerously!)
I flipped the house on its side to get access to the wiring rat’s nest. The wires at the upper left and bottom right corners, that aren’t attached to the tapewire, are the two other broken lights — I disconnected them after the first one burned up, but left them down there just in case my labeling was wrong and they weren’t the lights I thought they were.

That big wire in the middle of the picture is the new 1:12 light on the second floor. The one that’s plugged in is the sconce. I only had one outlet handy, so I added plugs to both wires and then tested each one separately.

And they work! Not only that, but all the other lights work too. Two didn’t initially, but the bulbs were just loose. Whew.

And that brings us to the end of another riveting installment of All the Reasons I’m Never Electrifying a Dollhouse Again. I hope you found this episode as illuminating as I did. (Ha!)
 Emily is a freelance writer, miniaturist, and adventure game enthusiast.


I’ve never used fancy tape-wire or other custom dollhouse lighting supplies (mostly because one can’t find it here in South Africa and have to import at great cost). When I electrified my first dollhouse, an old gent at our club helped me to use flex wire, and the dismantled inner of thicker cables to wire my dollhouse. We soldered and insulated every joint, and I’ve never had a moment’s trouble. In more than ten years I’ve never even had to replace a lightbulb, though admittedly I don’t turn the lights on often.
I think sometimes going low-tech is easier.
The lights you chose are beautiful, those rooms are shaping up beautifully!
I had not hear that Houseworks lights are super to Cir-iKit. I hav used both, too, and had problems. Same thing has happened to me–shorted out circuits with a bit smoke. A PoP and a crack and smoke. So discouraging. I have even ruined entire light! Expensive ones.
That was just my opinion based on my experience with them. The wires weren’t the only problem I had, I also didn’t like how the bi-pin bulbs are held in the fixtures. There are more details in this post: Cir-Kit half scale lights, and the sadness they caused me
My only experience with tape wire was not enjoyable so I’ve used round wire ever since. I have had a lot of good luck with 9 volt battery connections for lights. They even make them with little switches. It’s nice because you can switch different lights on and off.
And if you make your lights you can use Leds that run off a really small battery and make multiple lights.