Since my Hillside Victorian came with a French door added to the first floor, I decided to put in a deck. The room just inside that door is the master bedroom so I thought a private deck with hot tub would be nice.
My local dollhouse shop used to stock a Betty’s Wooden Miniatures deck kit with a built-in hot tub that seems to have been discontinued a long time ago. At some point they sold out of the kit with the hot tub and all they had left was a version without the hot tub. So, I bought a separate hot tub kit with the plan of bashing it into the deck. I’ll cover the hot tub kit now, and the deck itself in a later post.
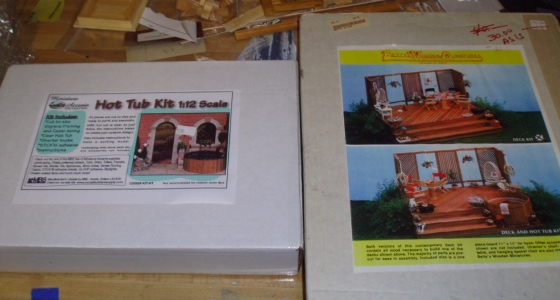
The kit is MBS brand and it’s available at Miniatures.com. I’ll start by saying that at $40, this is a pricy kit considering what you get. It’s all plastic, even the “wood.” If I’d known that I might not have bought it. The Miniatures.com description does refer to plastic siding but I didn’t make the connection. The kit comes with instructions for making the plastic look like wood, but it’s a labor intensive process… much more so than staining would have been.
The tub itself is a molded piece of plastic that looks more or less like a hot tub. They recommend painting the underside, so the paint shows through under a nice shiny finish. This would be easy-peasy with a solid color, but for “marbling” it’s problematic since you can’t keep covering up and blending until you get the effect you want… you’re pretty much stuck with whatever you paint first showing up as the top layer.
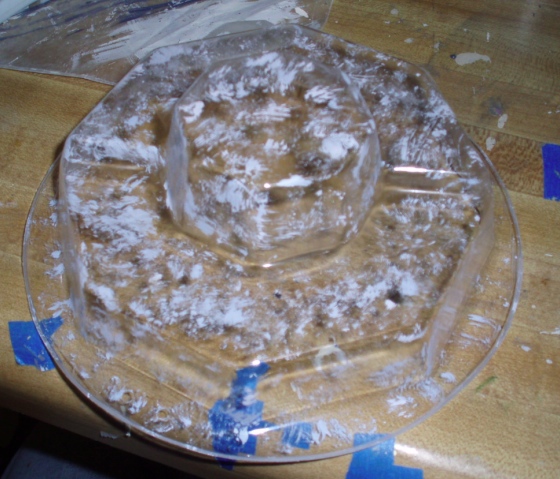
Throwing caution to the wind, I started with splotches of white and light blue, applied with an almost-dry toothbrush. After taking the photo above I added some gold, just for kicks.
Once those were dry, I painted over the whole thing with a blue “base coat.” I made this shade by mixing a few different paints (the light blue house color, the dark blue trim color, and another darkish blue I had lying around). I wanted it to look like “swimming pool blue.” Not sure if I achieved that, but it was a valiant attempt.

In the photo above, you’ll notice holes for the hardware. These need to be drilled into the plastic, and the instructions don’t say anything about how to space them or what size drill bit to use. Geoff helped me… we figured out the drill bit after three tries. I tried to center these vertically but it turns out I should have made them closer to the tub itself and farther away from the edge, since the screws that pop into these need to descend into the inside of the “wooden” part. It’s impossible to tell how much of an overhang the tub has at this point in the assembly.
Next it was time to turn plastic paneling into wood. (Sort of like turning straw into gold.) The paneling is a long strip that gets wrapped into a circle at the end of the building process. They give you a little piece to practice on, which I appreciated. The first step is to scribe “grain” into the plastic with an Xacto knife.
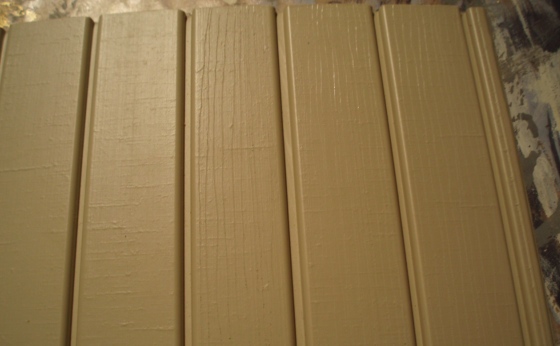
Above: the three panels on the right have been scribed and the ones on the left haven’t yet.
I found the scribing easier to do on the practice piece than on the longer, actual piece. My lines were very crooked, which I guess is okay for grain, but it was bothering me. I was holding the plastic horizontally and scribing vertically. I tried replacing the blade in my Xacto but that just resulted in cutting deeper (and accidentally cutting through the plastic a few times). After a while I realized it worked better to turn the plastic 90-degrees, and pull the knife horizontally to score the plastic. Don’t know if this is universal or if it just happened to work better for me.
Next step is to paint the plastic a brown base color. The instructions give recommended shades but I just used some I had on hand. The main thing is to use a dark brown for the base, and then a light brown and an even lighter brown to accent the grain. This is done with a dry brush technique: dip the tip of a sponge brush in the accent color, and then dab almost all of the paint off on a paper towel. Lightly swipe the sponge brush along the grain to highlight it. After this dries, you repeat the process with the second accent color.
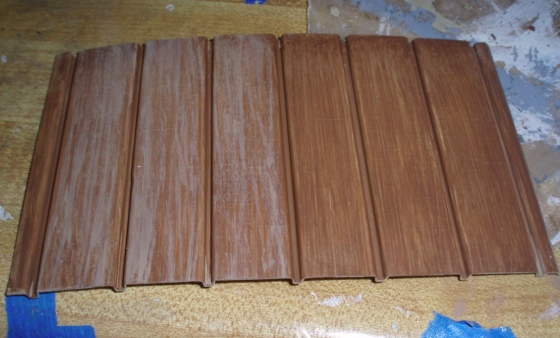
The three panels on the left have been accented and the three on the right haven’t.
I stopped taking pictures of the practice piece at this point. Here’s the real thing, with both accent colors. They give it a very weathered look, which I guess is appropriate.
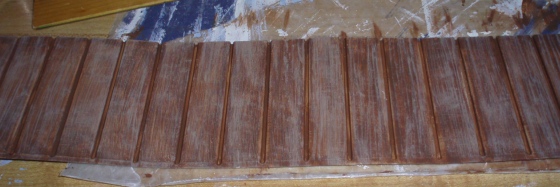
Next, using a dry brush again, you go over the accent colors with the original base color. I followed the directions but I’m really not sure if this turned out how it was supposed to. It looks reasonably like wood, though, so I’m okay with it.

A white piece of plastic forms the inside of the hot tub—it comes as a long strip and you have to wrap it into a circular shape. The kit comes with double-stick tape called “Stick’em,” but nowhere does it explain that this is double-stick, and it’s really not obvious. It just seems like regular (white) tape until you realize that the white part peels off to reveal a second sticky side. I had to look it up on the internet to figure out how it was supposed to work (lame!). Again, the directions left a bit to be desired here. Anyway, I didn’t take pictures of it, but you’re supposed to stick the Stick’em to one side of this piece of white plastic, then stick the “wood” paneling on top of it, and then shape the plastic and paneling into a circle. This did not work well; the paneling kept coming unstuck.
I peeled off the paneling and started again, this time forming the circle first, and then adding the paneling. It worked, however the hot tub ended up sort of an oval shape, not round. And the paneling isn’t very well stuck to it. In particular, I couldn’t get the ends of the paneling to stick together. When the Stick’em didn’t work, I tried glue, which also didn’t work‐the loose end just pulled up, pulling off some of the paint with it. Argh!
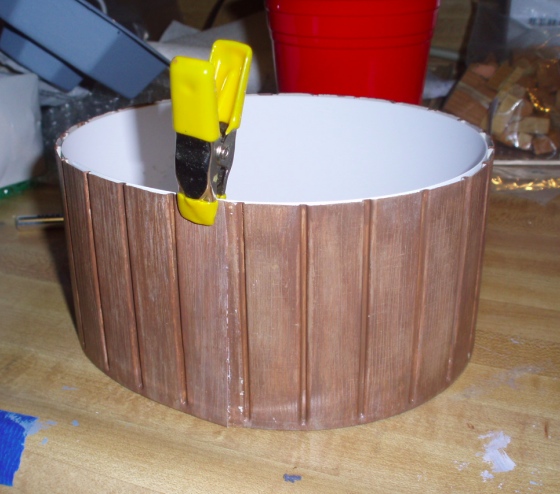
In the end I put a piece of Scotch tape over the seam, and even that isn’t holding very well. That part of the hot tub will be mostly covered up by the deck so I’m hoping it won’t be obvious!
I coated the paneling with satin varnish, and dropped the tub in to see how it looked. Perhaps exacerbated by the un-roundness of the base, when I dropped the tub in to see how it looked, some of the paint scraped off, leaving behind a clear area that you could see right through. I touched it up and did a heavy coat of varnish to (theoretically) seal it, but the next time I dropped the tub in the same thing happened. Maybe that’s to be expected when painting on plastic, but it’s annoying. I’ve finally managed to get the tub glued in without noticeably dinging it
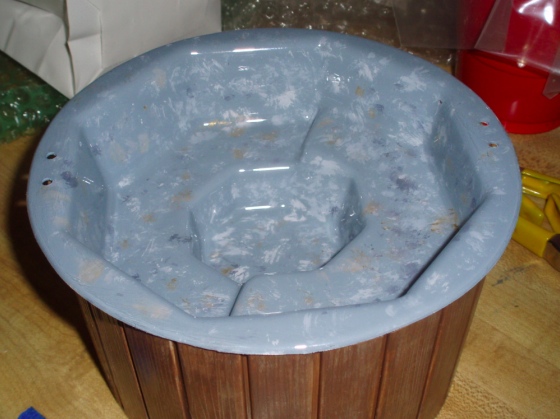
Um… my paint job isn’t much like a real hot tub. Oh well, it’s the thought that counts!
And here it is next to the house. The experimental blue looks okay against the siding, at least. And I am happy with how the paneling turned out… even though it took hours and staining real wood would have taken about ten minutes…
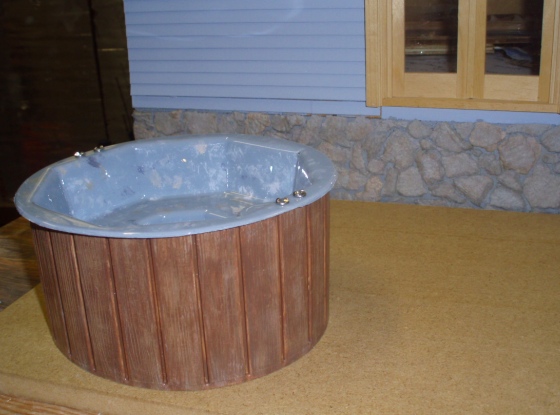
So, I have a hot tub! It’s nowhere nearly as substantial as I’d expect for $40, and that’s my main gripe with this kit. For $10, maybe.
Coming soon: the deck!
 Emily is a freelance writer, miniaturist, and adventure game enthusiast.


Wow, you had to cut the wood grain into it..why didn’t they, nevermind and thanks for the heads up. For 40 bucks I’d personally expect a lot more.
Oh, I think the painting looks great!
Thanks for saving me $40 bucks