May 2015: I started the Arthur as part of a Greenleaf community build in 2005, and at the time we blogged our progress on the Greenleaf forum. After a few site upgrades the old community blog has become hard to link to and I’m redoing my website anyway, so I decided to move those posts over here and backdate them. Sorry for any weirdness that results!
Build an Arthur in two weeks? Ha, easy! Err, yeah.
I am starting a few days later than everyone else because I had a busy week. My Arthur kit arrived on Tuesday but I wasn’t able to start until today (Saturday). This will be the third die-cut house I have put together (I’m also redoing one I bought already assembled). I have put the others together at my boyfriend’s hangar, where he’s building an airplane, because there’s a lot of space and all his tools are there. But because of the deadline to get this Arthur done, I decided to build it at home. We have a sunroom with a table where I can build, and I have most of the things I need right here at home (or so I thought). The hangar is a 30 minute drive away over a toll bridge, so going out there to get something I need isn’t exactly a good option.
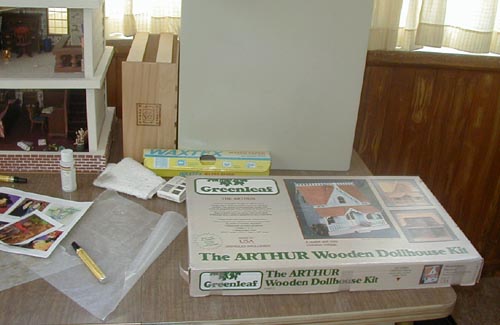
Anyway, at about 10:00 this morning I opened the box and got started. First thing I did was go through all the wood pieces and check them off on the schematic. The numbering was a little confusing on some of them. 9A is labeled on the schematic and not on the wood, and 11A is labeled on the wood but called “second floor” on the schematic. Also I’m confused about “Sheet #1-3”. I have one sheet that matches up with this (with trim on it) and it doesn’t have a number. There is a separate sheet #2. Does this mean I’m supposed to have another sheet of trim, and this would be sheet #3? (And why isn’t it called sheet #2?!) If so, I guess I’m missing a sheet. This happened with my Fairfield kit and Greenleaf was very good about replacing it promptly.
Now, on to the building! I see the first step is preparing the window trim… I’m skipping right over that one. :p When I built my first die-cut house (an Orchid by Corona Concepts) I followed the directions to the letter, including putting the trim on early. I learned it’s better to keep the trim until the end, though, because it’s much easier to wallpaper and paint before the trim goes up. In the past I have painted and papered before assembly, but I find it’s much easier to do this afterwards. When the house goes together there are often cracks at the corners that need to be sealed, and if the walls are already papered these cracks are going to show. Also if you paint first, the pieces don’t always fit together as well because the paint makes the tabs thicker and mucks up the insides of the slots. So with the Arthur, I will be assembling first and decorating later.
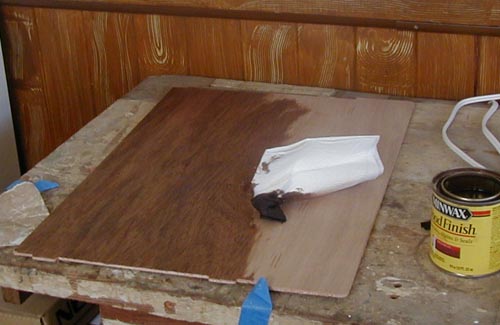
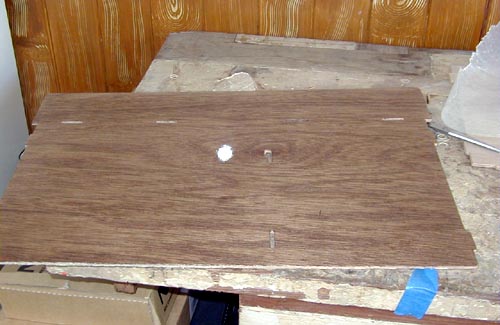
The first thing I did, though, was stain the first floor. I might wind up covering it instead, but it looks nice stained and it’s easiest to do this first before any glue gets on it (stain won’t go on over glue). I am not going to put the stairs in this house. I used to be a real stickler for stairs in dollhouses (how else can the little people get to the second floor?!) but the Arthur is pretty small and the stairs take up a lot of precious space in what will be the living room. So, I’m not going to punch the stair hole out of the second floor.
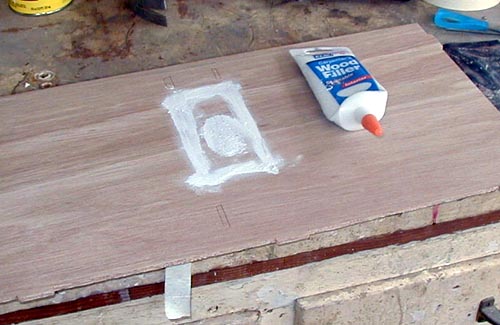
While I was waiting for the stain to dry, I filled in the cracks around the stair hole (is it still a hole if you don’t punch it out?!) with woodfiller. This may turn out to be unnecessary, since I’ll be putting some kind of flooring down anyway, but that at least gave me something to do while I was waiting for the stain to dry!
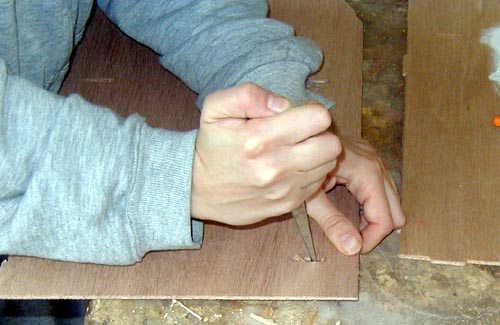
The 2nd floor partition fell off sheet #10 when I punched out the foundation. I labeled this with pencil so I’d be able to find it again later. I also punched out the left and right walls and taped the shutters together so they’ll be easy to find in the box later. I sanded the rough edges and punched out the slots. I usually use an old screwdriver for this, but it’s at the hangar, so I used a pair of scissors instead. Only one was really stubborn and needed its edges scored with a utility knife before I could get it out.
Then I made my first mistake… while punching out the tabs in the first floor, I inadvertently punched out the little one in the middle that’s meant for the stairs. Since I won’t be adding the stairs, that should have stayed in. I filled the hole with wood filler that’s supposedly stainable. We’ll see. May turn out I have to cover the floor anyway, but that wouldn’t be a huge loss. I’ve learned that dollhouses are all about illusion… I don’t worry so much about getting a perfect fit or a beautiful finish, as long as the cracks and mistakes can be easily covered up! (And they usually can…)
So, thinking I knew exactly what I was doing, I skipped over step two (gluing on the foundation) and went right to step three. I did this because gluing that little piece of foundation onto the floor seemed pretty precarious and like it would be very hard to get it at a true right angle. I thought gluing the sides on first, and then the foundation, would work better. Well… I tried… and I was wrong. Everything just slipped around too much. Part of the problem is the masking tape I have just doesn’t stick. I have much better tape at the hangar, but of course that’s 30 minutes away over a toll bridge!
So after about 45 minutes of mucking around with walls and glue (and knocking the digital camera off the workbench in the process, potentially breaking it), I ripped everything apart and went back to how it was supposed to be done. Right now the foundation back is gluing on, and I have lots of paint cans on top of the first floor to keep it flat while the glue dries. (Can’t take a picture because of the aforementioned digital camera accident…) When that piece is dry, I will glue on the walls, as the instructions said.
Off to see how the glue is doing… oops, not very well apparently. There seems to be a little warping in the floor and (as I expected) the edge of the foundation just isn’t wide enough for it to glue on well. So, guess I’ll have to improvise! I have some small wooden blocks that I have been using in various projects… I took four of them and glued them to the bottom of the floor and the edge of the foundation wall (the inside corner, that won’t show when the house is sitting upright). I think this will provide some stability and (hopefully) allow the foundation wall to glue on. Now I just have to leave it alone while the glue dries (something I’ve learned building die-cut dollhouses… when stuff isn’t working how it’s supposed to and I start to get frustrated, it’s best to WALK AWAY!)
 Emily is a freelance writer, miniaturist, and adventure game enthusiast.


Jumst walk away – good advice! I need to take it more often lol.