I did not intend to electrify the Fairfield. I figured with a house half the size of what I was used to, and for which it would be harder to find fixtures, it just wasn’t worth it. Then I saw someone else’s Fairfield lit up and changed my mind! I had already assembled most of the shell when I decided this, but I was still able to run tapewire to most of the rooms. The warping actually came in handy here because it allowed me to slip tapewire from the bedroom wall into the dining room, where the warped floor didn’t have a tight fit.
The wire in the kitchen goes under the foundation to the junction splice.

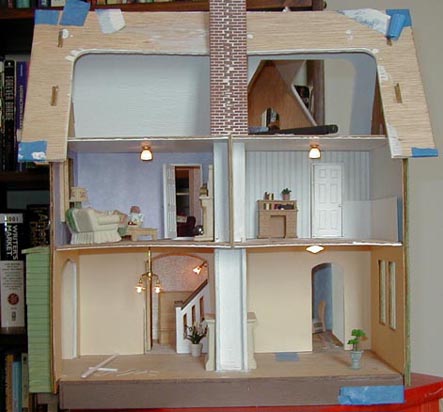
All the ceiling fixtures will be hardwired to the floor above them.

Half scale lights aren’t as easy to find as 1:12 lights, but Dollhouses, Trains, and More did have a small selection. Unfortunately, many of the ones they had on display were sold out Marie Toner lights, which are no longer available! But I did get a few. So far I’ve electrified the kitchen, living room, and front entry. I just ordered lights for the rest of the house from The Lighting Bug.
I put Marie Toner lights in the living room and entry. They really are neat. And interestingly enough, the wires didn’t split or break at all as I was wrapping them around the brads… with most lights this happens a lot! It made me wonder if these use a different / better quality wire than most of the mass-produced ones. The living room light hangs down a bit low, but in this room it shouldn’t interefere with any furniture.


I really like the fixture I put in the dining room, but am concerned that with the high ceilings and the bigger light in the living room, this one may look funny. I was thinking of getting a chandelier but didn’t want to spend too much money. I guess as long as I don’t glue down the carpet upstairs just yet, I can change my mind about this one. The light might not look so small once I put furniture in this room. (This is a Lighting Bug fixture.)

In the kitchen I used a mass-produced light I got at Dollhouses, Trains, and More. The light really helps to brighten up this room (especially after I wallpapered it).

A view of the whole fixture:

The two upstairs rooms also have Lighting Bug fixtures. I decided to use the same fixture in both rooms.
The sitting room:

The master bedroom:

The upstairs hall and bathroom also have Lighting Bug fixtures. Once I put in the tower wall on the third floor, I will have to put wood filler in the slot and then sand it and paint over it. Having the light fixture there would get in the way. So I left the wires very long and have not glued the fixture in yet (a piece of scotch tape over the wires on the floor above is holding the fixture in place). When it comes time to cover up that slot, I will be able to move the light out of the way to reach that spot.


I do plan to add lights to the third floor, but not quite yet. I already have a Marie Toner standing lamp and a Lighting Bug desk lamp to put up there. I may get one or two other table lamps, and I’m going to buy a wide screen TV that lights up as well. Those will all be hard wired to the floor, which limits how the furniture can be arranged. So I’m not quite ready to add them yet. In the meantime, here are a few pictures of the whole house lit up.

 Emily is a freelance writer, miniaturist, and adventure game enthusiast.


Don’t the lights make a huge difference to the house? I always think they bring it alive!
HI Emily! I found your blog while researching how to wire my Fairfield. I was wondering, when do you think is the best time to wire it?! Once the shell is assembled, and then add flooring last? I may have a lot of trial and error, I keep dry fitting and I’m scared to start gluing. hahaha!
You have to work out where the lights will go and which walls you’ll pull the wires through. Then you can figure out the order of when to electrify and when to finish the room. Also consider how you’ll get the tape from floor to floor, even before you assemble the shell. I would put a piece of tape wire vertically on one of the exterior walls or the center wall before you assemble, so you can easily tap into that on each floor. Then if you’re going to install a wall sconce, finish that room, drill a hole in the wall, and run the wire through to the unfinished room next to it so you can hide the wires with wallpaper and flooring. Same with a ceiling fixture: finish the room, then run the wire through to the unfinished room above and cover with flooring.
I have a light in the Fairfield that doesn’t light up anymore, and to check the connection I would need to pull up the flooring in the room above. To avoid this sort of thing, I did my most recent wiring where I ran the wires all the way down under the house and used outlets there. You can see what that looks like here: https://www.emilymorganti.com/blog/?p=13554
If you take a look at the electricity tag on my blog it might give you some ideas of the order I do things in: https://www.emilymorganti.com/blog/?tag=electricity
And here’s a good article on the Greenleaf website about wiring: http://www.greenleafdollhouses.com/dollhouse_news/feb2009/dollhouse-lighting-kits.html
Hope that helps! Good luck with your Fairfield!