I wanted a corner couch for my Rosedale’s second floor TV room, and unable to find any modern sectionals in half scale, I decided to make my own. IKEA furniture tends to have clean, straight lines—perfect for miniaturists like me, who don’t have the tools or the patience to get too fancy—so I checked out their website for possibilities.
The Karlstad corner sofa caught my eye, but it would be much too large for the Rosedale’s small room. I modified the design, coming up with my own dimensions to fit the space where I intended to use it. (Ironically, I ended up doing a standard couch rather than a sectional.) My few attempts at upholstery haven’t turned out so well and I thought if I tried to cover the sofa in fabric, it would be difficult to maintain the clean lines. Instead, I picked out neutral-colored scrapbook paper with a leather-like pattern.
After posting pictures of the result on the Greenleaf forum, a couple of people asked for a tutorial, so I made a complementary chair with fuzzy “suede” paper and took step-by-step pictures. I hope some fellow half-scalers find them useful!
Materials needed:
- Strip wood in the following lengths:
- 1″ x 3/16″
- 1″ x 1/8″
- 1/8″ x 3/16″
- 3/8″ x 3/8″
- Scrapbook paper with a fabric-like pattern (one sheet is more than enough!)
- Matte sealer (optional)
- Mod Podge and Tacky Glue
- Paint or stain for legs
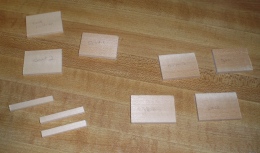 |
Step 1 For the chair, cut strip wood into the following sizes and label each piece. 1″ x 3/16″ strip wood:
1″ x 1/8″ strip wood:
1/8″ x 3/16″ strip wood:
For the couch, the Back, Bottom, and Supports need to be 3″, and you need two each of Seat Cushion A, Seat Cushion B, and Back Cushion. |
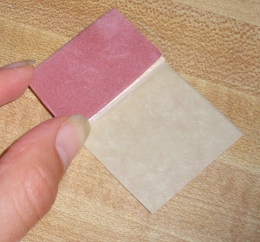 |
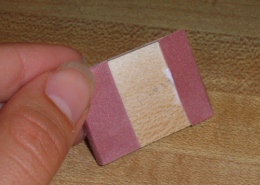
Step 2 Starting with the Back and Bottom, cut scrapbook paper to cover both surfaces and one of the longer edges. Fold the paper over the wood block to form a neat crease. After cutting, label the inside of the paper so you know which piece it goes with. |
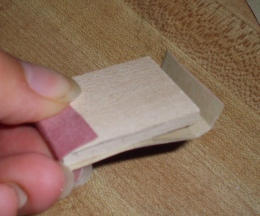 |
Step 3 Cut paper to cover the Arms. For these, you need one piece that covers both surfaces and one long edge, plus a second piece to cover both short edges (shown at left). Instead of one long piece, you could cut two smaller pieces, but if you do it this way the paper’s edges might show through on the outside of the arm (this happened to me when I made the sofa). Once you’ve cut paper to cover the Back, Bottom, and both Arms, you might want to spray the paper with matte sealer before moving on to the next step. I didn’t do this with the chair because I didn’t want to mess up the paper’s fuzzy texture, but I did when I made the sofa. |
 |
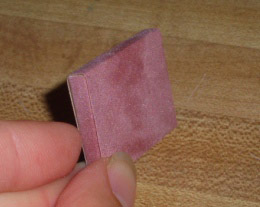
Step 4 Use Mod Podge or another easy-to-spread glue to attach the paper to the Back, Bottom, and Arms. For the Arms, start with the piece that covers the two short sides. Make sure the creases at the edges are nice and neat. |
 |
Step 5 This isn’t really a step, I just wanted to show another picture of the Arm with the second piece glued on. If the edges of the paper underneath are visible through the top piece of paper, this side should face in when you glue the Arms to the Back. (You want the Arms’ outer edges to be smooth, since these will be more visible.) |
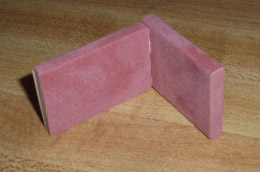 |
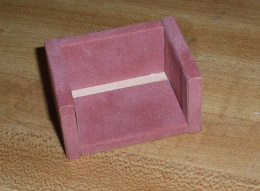
Step 6 Run beads of Tacky glue along the Back’s (uncovered) short edges and attach the Arms. The back of each Arm should be flush with the back of the Back. (Got that?!) |
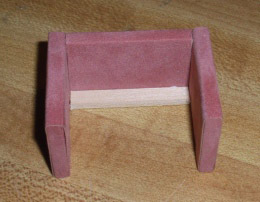 |
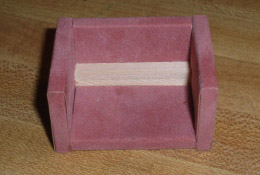
Step 7 Glue a Support to the Back and Arms. The wider edge of the Support should be perpendicular with the Back. |
 |
Step 8 Glue the Bottom to the Arms and Support. The front of the Bottom should be flush with the front edges of the Arms. (If it’s not, you probably put the Support in the wrong way…) |
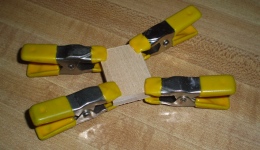 |
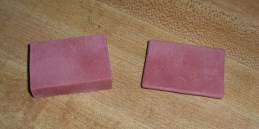
Step 9 Glue Seat Cushion A and Seat Cushion B together. Clamping may be necessary for a flat result (or maybe the strip wood I had was unusually warped!) |
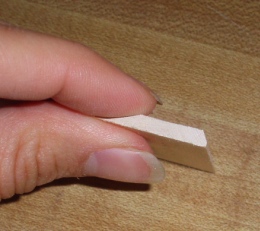 |
Step 10 Sand one long edge of the Back Cushion at a 45-degree angle. This will allow it to sit flat on top of the Seat Cushion. I used a belt sander (best invention ever!) but in the absence of power tools, regular sandpaper should work fine. |
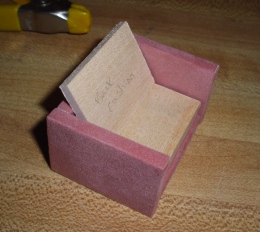 |
Step 11 Test your cushions to make sure they fit and the angle is good on the Back Cushion. Keep in mind that the scrapbook paper will add a little bulk; these should not be snug. This is especially important with the sofa. When you push the cushions up against the arms, if there isn’t about 1/8″ of space between the left and right cushions, sand them a bit before moving on to the next step. |
 |
Step 12 Cover the cushions like you did the arms. For the Seat Cushion, paper should cover both short edges, the entire top, and at least one of the long edges (the front). The back edge and bottom of the cushion won’t be visible so you can choose to cover those parts or not. For the Back Cushion, all edges should be covered, including the angled edge. To get the fit right around the angle, you can fold the paper over the wood and carefully trim away any excess from the corners using nail scissors. The paper doesn’t have to cover the entire back side of the cushion, but make sure to use enough so that there won’t be any wood visible when the chair is viewed from behind. Spray the paper with matte sealer (if desired), then glue it onto the wood pieces with Mod Podge. Like with the arms, cover the cushions’ short edges first, then the front surface and long edges. |
 |
Step 13 Glue the remaining two Supports on top of the first one. Again, the wider edge is perpendicular with the Back. |
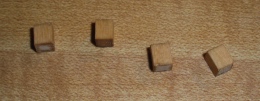 |
Step 14 Cut the 3/8″ x 3/8″ strip wood into four 1/4″ pieces. These are the feet. Sand away any crumbs and paint or stain as desired. |
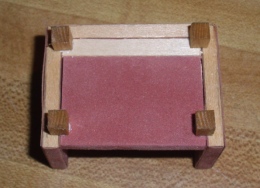 |
Step 15 Flip over the chair and glue on the feet in roughly the positions shown here. The placement doesn’t have to be exact, but do make sure the feet are lined up with one another (you can use the seams where the pieces meet as guides). |
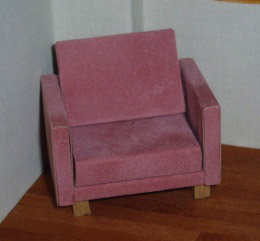 |
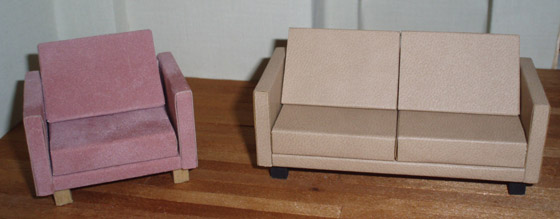
Step 16 Sit back and admire! I’ll probably add throw pillows to mine at some point. I like the fuzziness of this paper but it’s thicker than what I used for the couch, and harder to work with. If I do another of these I’ll probably go back to something that’s a bit easier to fold. Luckily with half scale it’s all about the illusion… the fact that it’s paper and not real fabric doesn’t jump out at you at all. |
As far as the measurements go, this is not a strict 1:24 reproduction of IKEA’s Karlstad furniture. I made the couch fit the space I wanted it in, then for simplicity’s sake I halved the measurements to create a (large) chair. IKEA lists dimensions for each piece on their website; you can easily convert these into half scale by dividing each by 24. (Or by 12, for 1:12 scale.)
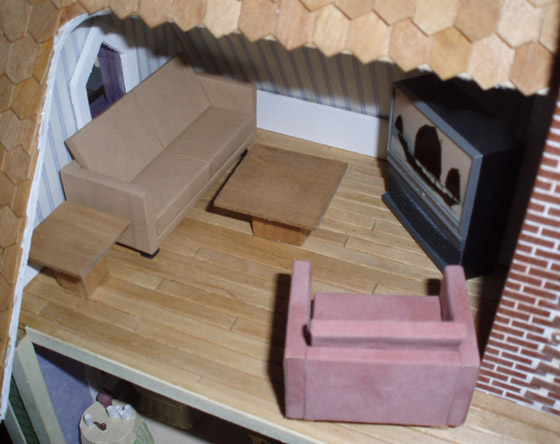
For a point of reference, here’s how they look with some other half scale furniture in the Fairfield’s attic. The coffee tables are kits from SDK Miniatures.
I might still try a corner couch, or at least one with a chaise. Come to think of it, it would be easy to add a chaise to the existing couch, I’d just need to make a base to butt up against it and replace one of the seat cushions with a longer one. Modular furniture!
 Emily is a freelance writer, miniaturist, and adventure game enthusiast.


Leave a Reply