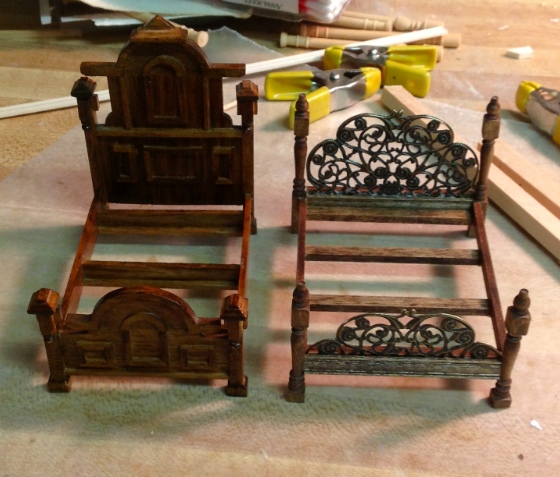
I recently bought a Victorian bedroom set for my half scale Queen Anne Rowhouse. I really liked how the ornate bed looked with the damask wallpaper and wood trim in the room, but the only good place to put the bed is up against the window, which then gets blocked by the tall headboard.
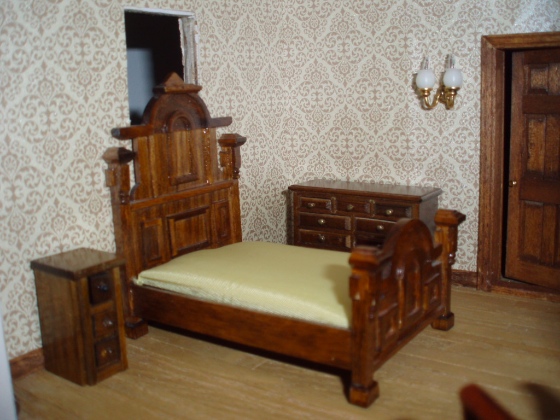
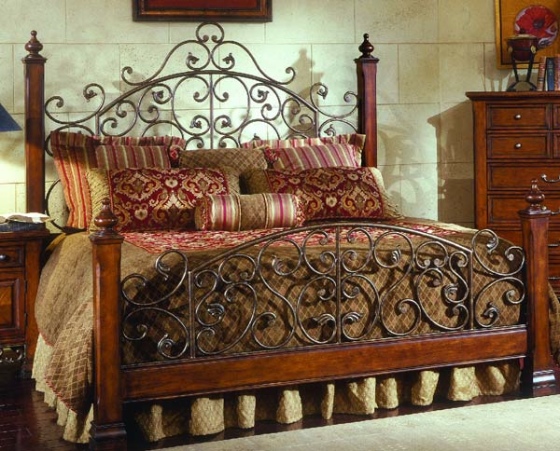
I wanted to replace it with something equally ornate, but with a less obtrusive headboard. I did a Google image search for “Victorian bed” and this was one of the pictures that came up. Pretty!
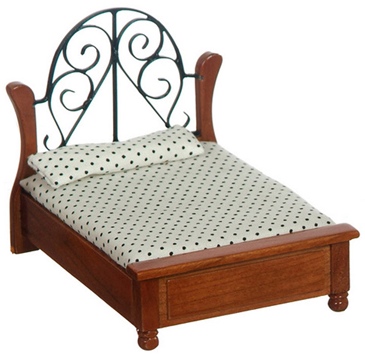
The only bed I could find in half scale that looked remotely like it was this one, made by Town Square Miniatures, which retails for $16 (plus shipping). It’s cute but doesn’t have the elegance I was looking for, and I figured I could make my own for less than that.
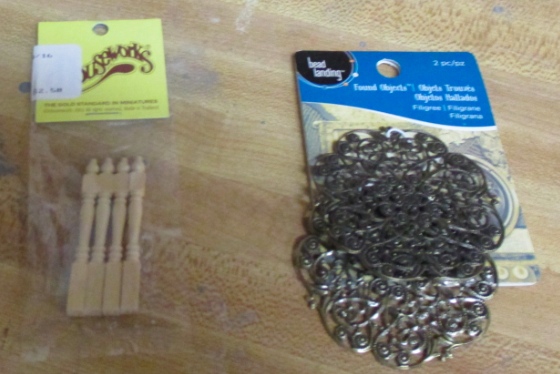
I got a package of filigrees in the jewelry section at Michaels, and a package of Houseworks legs from the mini shop, for a grand total of $7. The rest of the wood I used were pieces I had on hand already, but even if I’d bought them I think the materials would come in at less than $16.
And the end result is much prettier. :)
Want to make your own? Read on for a tutorial!
What You Need:
- 1 package of jewelry filigrees (this one or equivalent). Pay attention to the width since that dictates the width of the bed. The one I used is 2-3/8″ at their widest point.
- 1 package of Houseworks legs
- Frame: 1/4″ x 3/32″ basswood
- Frame back: 5/16″ x 3/32″ basswood (I only used this bigger piece for the frame back because I ran out of the size listed above. So you can use this larger piece for the back like I did, or leave out this out and make all four frame pieces from the 1/4″ x 3/32″ basswood.)
- Supports: 1/8″ x 3/16″ basswood
- Spacer: 3/8″ x 1/4″ basswood (the 3/8″ is the important part here, so if you have another piece of wood lying around that’s 3/8 by something else, you can use that instead)
- Fancy trim: I’m not sure if this is the same brand, but I used “door and window casing” that’s 1/4″ wide. If you can’t find this specifically, then any trim that’s 1/4″ wide will work in its place.
- Glue: Tacky and Quick Grip
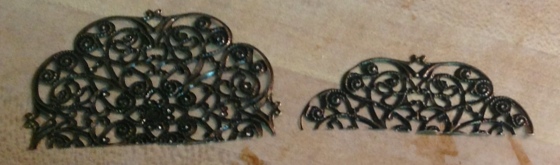
Step 1: Cut the filigree into two pieces to use as the headboard and footboard, with the headboard larger than the footboard. If you’re using the same filigree I did, you want the headboard to be 1 1/2″ tall and the footboard to be 7/8″ tall.
Step 2: The legs will be used upside down from their intended purpose, with the pointy part up. Take two of them and cut off 1/2″ from the bottoms to make them 1 11/16″ tall. The space under the bed will be 3/8″ — just above the third ring on these short legs.
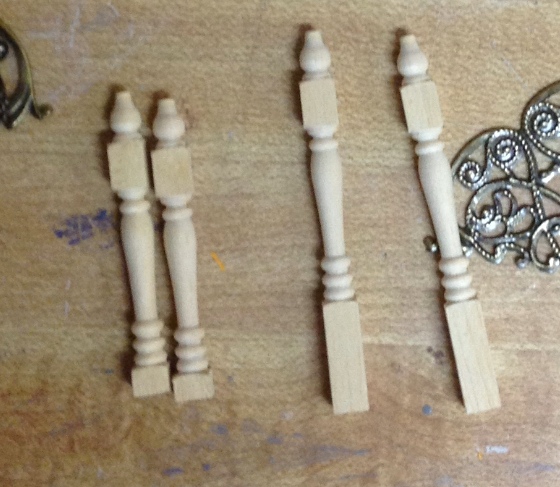
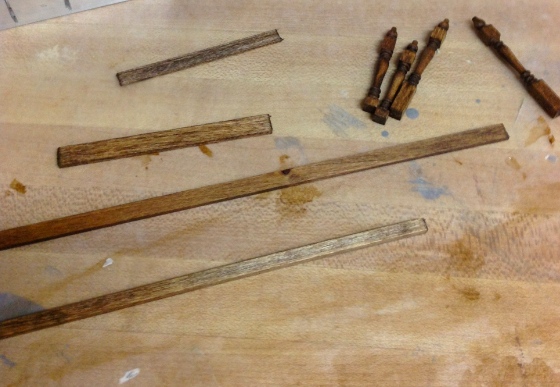
Step 3: Stain the legs and basswood. I used Minwax English Chestnut.
The basswood lengths you’ll need are approximately 11″ of the 1/4″ x 3/32″ frame piece (a couple of inches less if you’re using the bigger piece of wood for the back), approx. 10″ of the 1/8″ x 3/16″ support piece, approx. 2-1/2″ of the 5/16″ x 3/32″ back frame piece (if you’re using it), and about 5″ of the fancy trim. I always like to stain extra in case I mess up a cut. The 3/8″ x 1/4″ spacer doesn’t need to be stained.
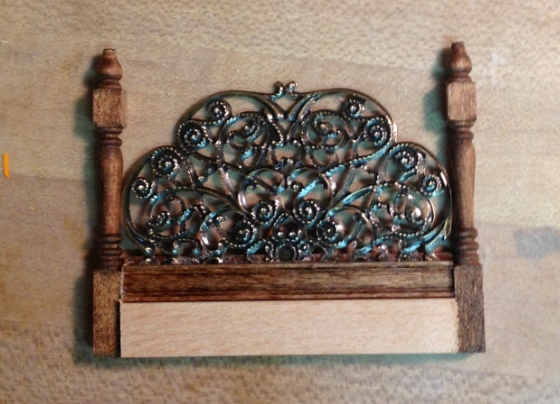
Step 4: Once the stain is dry, assemble the headboard. I cut the little doodads off the sides of the filigree, ending up a width of about 2-5/16″. Cut the back frame piece and a piece of fancy trim the same width as the filigree. Sandwich the filigree between these, with the fancy trim facing forward, and glue, keeping all three pieces flush at the bottom. I usually use Tacky Glue, but found Quick Grip worked better for gluing the metal to the wood.
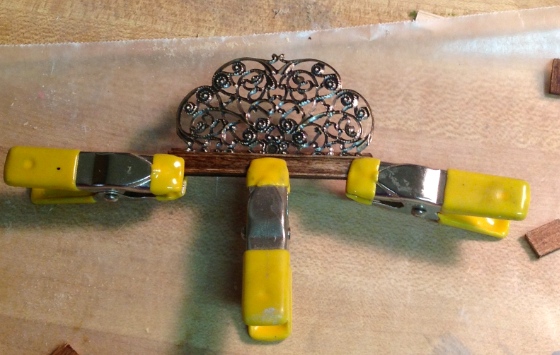
Step 5: Cut a spacer piece from the 3/8″ x 1/4″ basswood that’s the same width as the headboard. Use this to attach the legs to the sides of the headboard with a 3/8″ space at the bottom.
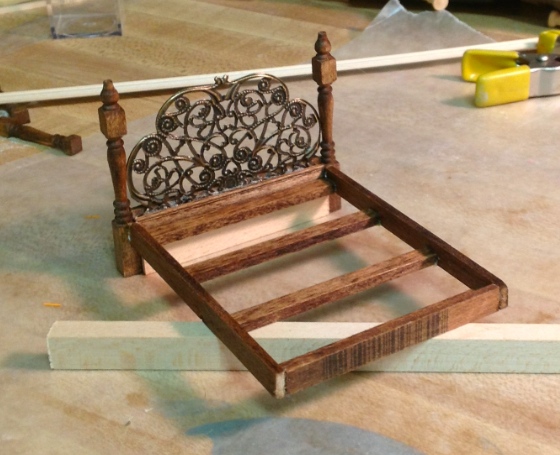
Step 6: While the headboard is drying, assemble the frame. Cut one frame piece the same width as your headboard — this was 2-5/16″ wide for me, and I held it up against the headboard to make sure it matched. Also cut two 3″ frame side pieces, and four 2-5/16″ support pieces (or whatever width they need to be to match the headboard and footboard).
Glue the frame together with the footboard frame piece between the two side frame pieces. Add the four support pieces with the wide side facing up. Gluing all of these pieces at once will keep the assembly square.

Step 7: When both the headboard and frame are dry, glue the frame to the headboard legs using spacer pieces to maintain the 3/8″ space under the bed.
Step 8: When that’s dry, hold the footboard filigree up against the footboard portion of the frame and make sure none of the metal protrudes onto the front edges of the side frame pieces (that’s where the legs will go). Trim if needed.
Step 9: Spread Quick Grip across the footboard part of the frame and glue on the filigree and legs, again using the spacers to maintain the 3/8″ space under the bed. The legs will be wobbly but the Quick Grip should at least bond them loosely to the frame. Make sure they’re straight.
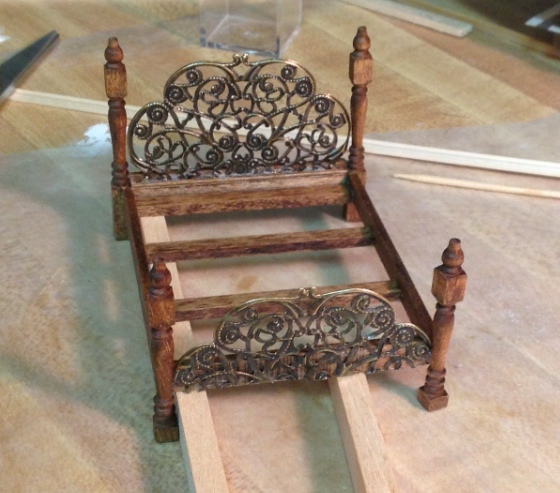
Step 10: Cut the remaining fancy trim so it fits exactly between the two front legs. Glue this on using Quick Grip on the back (to adhere to the filigree), but Tacky Glue on the sides (to adhere to the legs). Leave the bed alone to dry. If the legs are still wobbly the next day you can pull them off and re-glue using Tacky Glue.
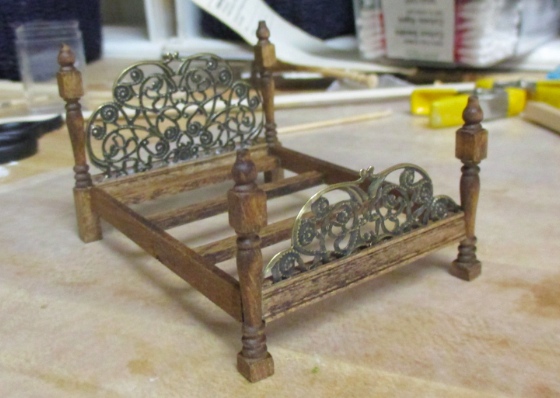
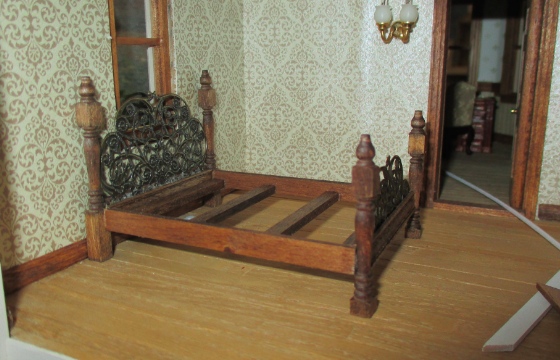
Ta da! I used the Victorian bed with the too-big headboard as a guide for making mine, so the dimensions are roughly the same, but my bed is a little wider due to the width of the filigree. My theory is that the original bed is a Queen, and the scratch built is a King.
Update: Check out the dressed bed here!
 Emily is a freelance writer, miniaturist, and adventure game enthusiast.


Awesome! Thanks for sharing
Hello Emily,
The bed you made ??yourself is much more elegant than trade!
Moreover, the 1/24 scale is much harder to work with than the 1/12! Réussitte beautiful!
If you are looking for items miniatures scale 1/24 you can go to this site: http://www.piccoletentazioni.it/ptshop//index.php This is a serious Italian site where I ordered several times already for my house at 1/24 scale. I do not know if you can order from the United States, but I think so.
See you soon.
I wish you a pleasant evening.
Thierry B
Your version is MUCH prettier than the TSM bed. Thanks for taking the time to write up and share the tutorial!
OMG This is gorgeous! :) thank you for sharing.
love it! Husband built granddaughter a doll house. This will be perfect! Thanks, Tammy
I absolutely love your idea and can not wait to do this on my own. This bed is stunning.
Beautiful, beautiful bed. Thanks for sharing. You are so generous with your expertise.
Suas miniaturas são maravilhosas…sou apaixonada por miniaturas e gostaria muito de um dia conseguir fazer algo tão lindo…beijos
Obrigado!
wow great job !!!
Really lovely – thank you so much. I will have to try this one.
Hi Emily I was wondering where I could buy the real bedroom set in the big picture not the miniature?
I don’t know, sorry! I found the picture with a Google image search and don’t know its original source. (I tried doing a reverse image search and it shows up on a lot of blogs and on Pinterest, but nothing that makes it obvious where you could buy it.)
I love it, gorgeous stunning. OMG can’t wait to make my own.
What a great idea and so well explained – thanks a lot!
Como se corta el filigrana? Un saludo
It’s very thin, I cut it with scissors. You could also use small wire cutters.
my my my,
I need one for my bunny dolly.
Thank you for sharing great job.
Maravillosa idea!!! Gracias por compartir!!! Eres grande!!!