WARNING: My last post about Rosy’s tongue was kind of cute. Today’s is kind of gross. Just putting that out there.
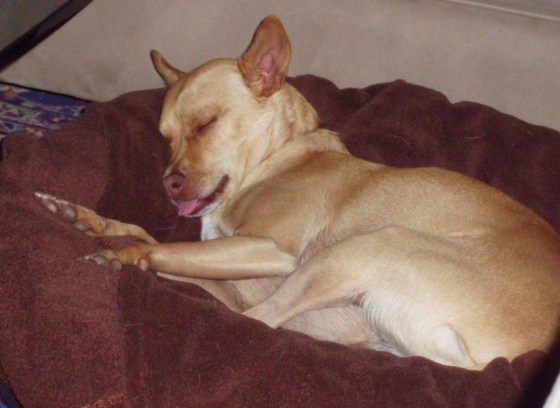
So on November 4, I took Rosy to the vet for her annual check-up. While there, she panicked (as she usually does) and started panting heavily, which led the vet to notice some cuts that looked consistent with having bitten her tongue. For a couple of weeks she’d been backing away from her food bowl during meal times, which is also a symptom of a sore tongue. The doc asked me to start soaking her food until it was mushy, and bring her back in a week to see if the cuts had gotten any better.
On the 12th, I took her back. The cuts were still there and didn’t seem to be healing. The vet prescribed an antibacterial mouth rinse that I was supposed to spray in her mouth twice a day for a week. (The spray bottle near Rosy’s head freaked her out, so we ended up giving it to her on a spoon. On the plus side, it made her breath smell minty!) After a week of this, I tried soft food mixed with hard food and she backed away from the bowl again, so I was asked to bring her back for another visit.
The day before Thanksgiving, we went in and Rosy had another panic attack in the office, providing another great look into her mouth. The cuts were still there and there seemed to be more of them. Dr. Kat (who also sees dogs!) prescribed an antibiotic and another medication called Sucralfate that changes the pH of the mouth, hoping these would help the cuts heal. The antibiotic was a pill that was easy to disguise in cheese. The other medication was a pill that had to be dissolved in water and then squirted into the mouth with a syringe — another thing Rosy wouldn’t stand for. Instead she spent a week licking that stuff out of a spoon after every meal, ending up with a foamy bottom lip that alternately looked like she had a “milk beard” or like she was frothing at the mouth. Lovely.
So we went back last Wednesday and though the cuts looked a little better, they had still not healed as well as they should have after a month, and Dr. Kat thought we should do a biopsy and culture. We’re still waiting for the results. Hopefully it’ll turn out to be trauma (tongue bite) plus some sort of bacterial infection that can be countered with an antibiotic that specifically targets whatever bacteria it is. There is a slim chance of cancer or other problems but that seems unlikely based on the nature of the cuts.
All of this is to explain why I’m now posting a gross picture of my dog’s enormous tongue…
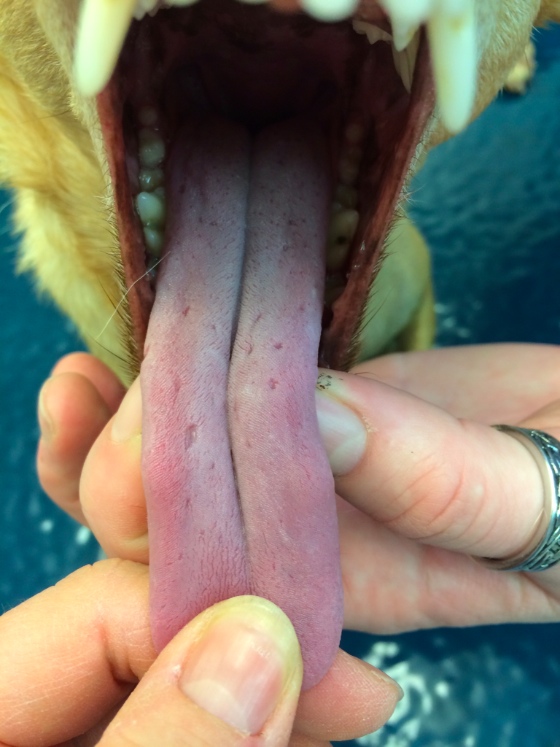
The cuts are those prick-like holes. They’re not bloody or scabby or anything, but look like if you scraped yourself and the top layer of skin scraped off to reveal the moist skin underneath.
Dr. Kat took three biopsy samples and sewed the areas up with sutures. She says that Rosy has a pretty rough tongue and it bled way less than she expected.
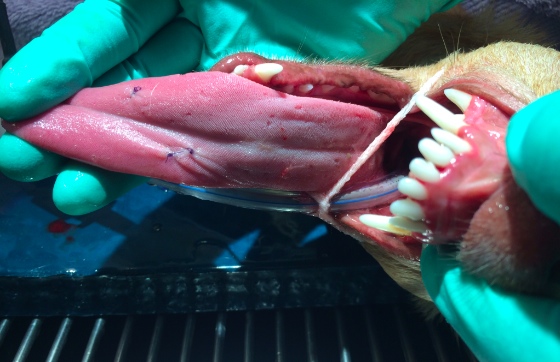
Rosy was groggy and confused afterwards, worse than other times she’s been under anesthesia. For the first few hours after she woke up she seemed scared to open her mouth and especially scared to eat, but once she realized it didn’t hurt she got over it. The next day she was back to normal, and the sutures fell out a day or two later. We went home with four days’ worth of Tramadol but she only needed it the first day. No obvious tongue distress that we can see.
We don’t know yet what the problem is, so at this point this is a story without a satisfying conclusion. I really just wanted an excuse to post these gross pictures…

 Emily is a freelance writer, miniaturist, and adventure game enthusiast.

