This is a carpet I charted myself, based on a photo I found online. I’m planning to post the chart for download but I want to tweak a few colors first. I’m going to make a smaller version to try out the corrections and then I’ll make both charts available for free (for personal use only).
A couple of years ago I made a safari nursery rug based on real rug, but the Kashkuli Gabbeh is a lot more complicated! I was surprised I couldn’t find any how-to articles online for how to convert a carpet picture into petit point, so I’ll walk through the steps here, as best as I can remember (I charted it about five months ago).
This Kashkuli Gabbeh rug happens to be one I had my eye on for my real life house but didn’t end up buying. I thought the different bands in the center would be fun to do in petit point. I like stitching rugs that have a lot of different motifs, to keep things interesting. Along these lines, I’ve already stitched two Bakhtiari carpets (one designed by Sue Resseguie and the other by Lucy Iducovich), but one can only have so many Bakhtiaris!
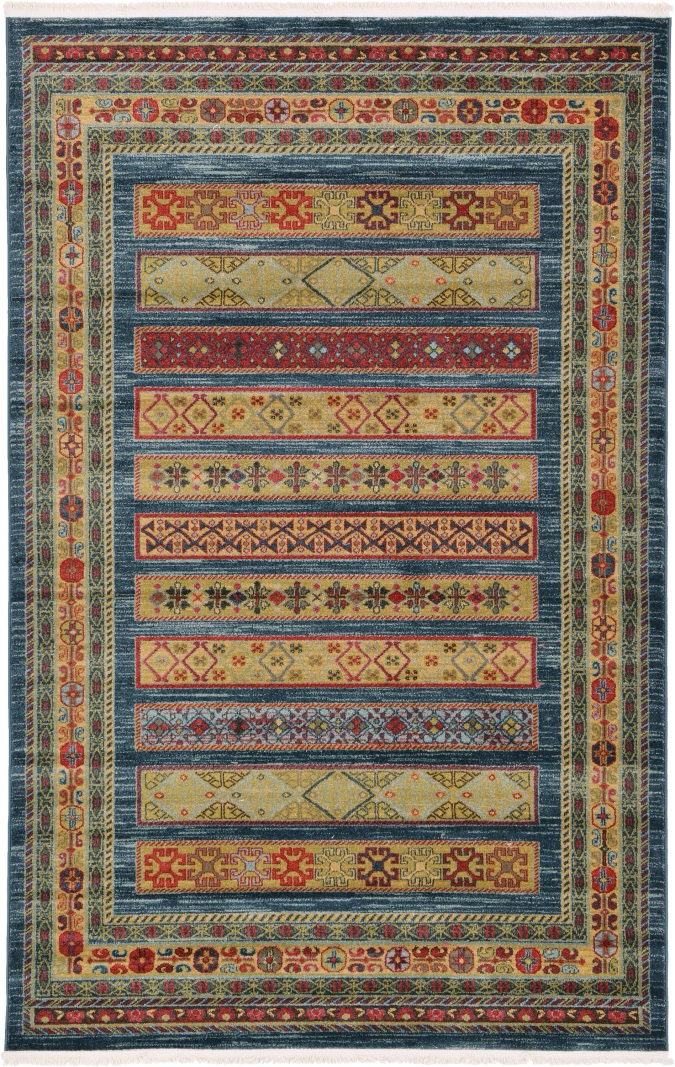
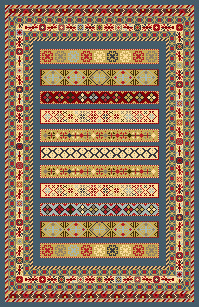
Here is the picture I adapted.
 I started by shrinking it down to 199 x 307 pixels. I think I used Photoshop’s Bicubic Sharper setting when I reduced it, but it might have been regular Bicubic. One pixel is equivalent to one stitch, so this comes to about 5″ x 7.5″ on 40-count.
In hindsight I have no idea why I chose this size. I knew I would be stitching it on 40-count so it might have been as simple as wanting a size that could work in half scale. But then why didn’t I make it 200 pixels wide? Due to my lack of note-taking, we’ll never know.
Actually, in my defense, I want to clarify about the lack of note-taking. Knowing I would want to document this process so I’d remember how to do it later, I did scribble down some notes on sheets of graph paper that I used to map out some of the design as I was working it out. The graph paper sat on my messy desk for months and months, until I recently spilled a glass of red wine on the desk and had to throw away the drenched pages. So it’s entirely possible that this process I’m now trying to recreate for you was documented there and got ruined. (Okay, considering the circumstances, I don’t know if this defense really redeems me.)
The shrunk-down graphic looks okay at its regular size, but of course that’s much too small to see the individual pixels/stitches. When you blow it up to see the detail, it gets fuzzy. If I tried to import this into the cross stitch software to make a chart out of it, it would be a mess of colors and confetti stitches.
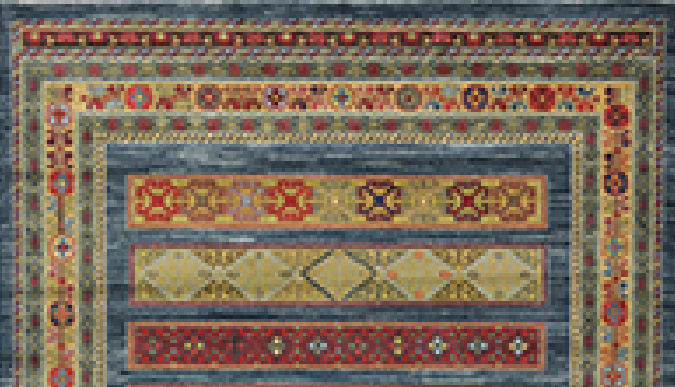
Luckily when you zoom in on the image, Photoshop outlines the individual pixels. This allowed me to draw over and simplify the design one pixel at a time, referring back to the original picture when I had trouble deciphering the reduced image. I drew out some motifs on graph paper to figure out how to make them fit in the space I had, but unfortunately I can’t show you that due to the wine incident.

 Here’s the redrawn graphic. I used 12 different colors in it. Using Photoshop’s “Save for web” option, I saved it as a PNG limited to 12 colors to ensure a 1:1 correlation between the colors I used and the colors saved in the file.
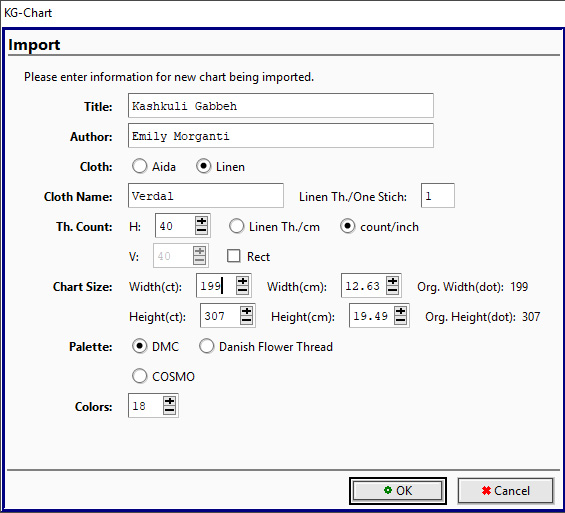
Then I converted the picture into a cross stitch chart using a quirky program named KG Chart. There are more robust options out there, but I taught myself how to use the free version of KG Chart for my Thimbleweed Park afghan — the free version lets you do designs up to 100 x 100 pixels, which was all I needed for those characters. But something bigger, like this carpet, requires the $35 pro version. Calling it “pro” is a bit of a stretch, but it does almost everything I need.
That said, KG Chart does have some trouble dealing with colors. When I tried importing the image with 12 colors, KG Chart arbitrarily decided to combine some of those colors. You know, to be helpful. So I had to import it with more colors, and then delete a couple that KG Chart added but didn’t appear anywhere in the design. I also had to manually enter the dimensions in the Chart Size boxes match the actual size of the image being imported, since KG Chart somehow gets that wrong.
Once the chart was imported, I made the symbols more user-friendly and replaced the automatic color choices (which are often hilariously off) with my own. I used my DMC color card and the original rug picture to pick the colors.
(I’ll digress here to mention that the DMC color card was also on my desk when I spilled the glass of wine. I used this as an excuse to buy a new and improved DMC color card that has all the currently available colors — the old one was about 15 years old, and out of date. So spilling that wine wasn’t a horrible thing in the end.)
As I was stitching the rug I made some additional corrections, that I later incorporated into the chart.

One big issue was that the light yellow and light green didn’t have enough contrast, even though it seemed like they would when I lay the DMC colors on top of each other. To deal with this, I swapped out some elements that were supposed to be light yellow with brown or tan, which you may spot if you do a side-by-side comparison of the original and my stitched version.
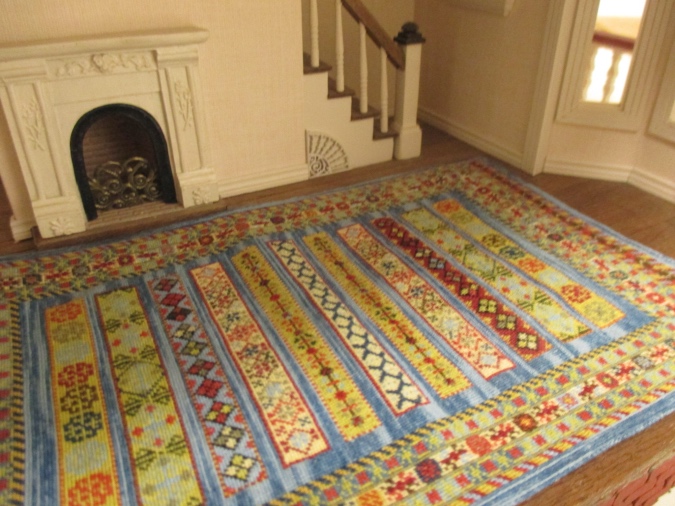
Here’s my finished rug (a bit warped, I need to iron it).
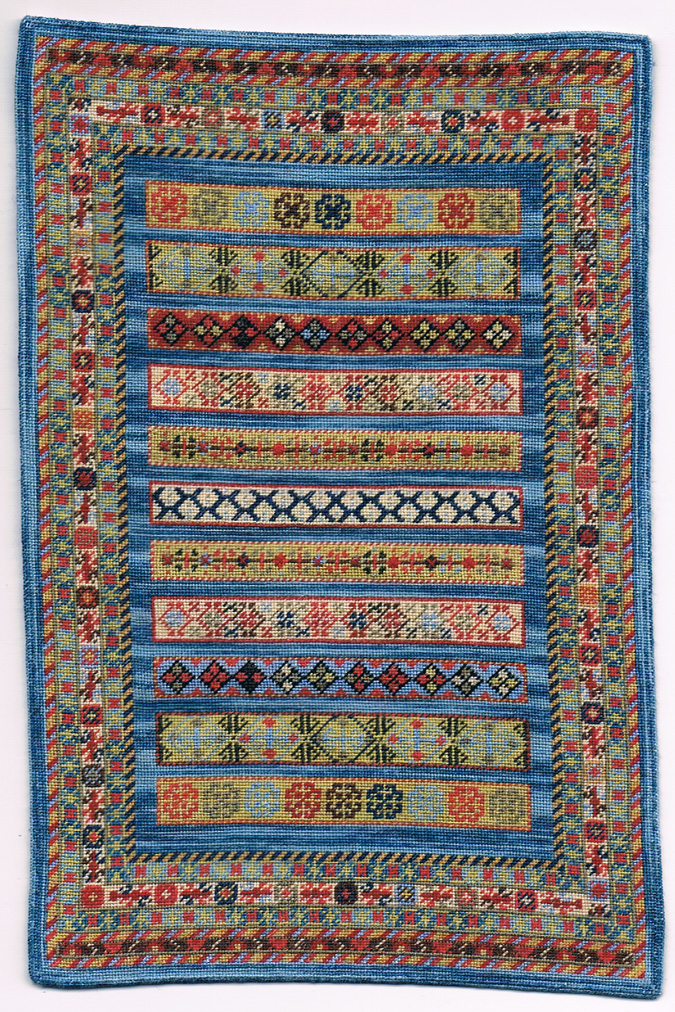
I used Weeks Dye Works Union Blue for the variegated blue background. I like it overall, but don’t like how it looks in the areas next to the bands, where there wasn’t enough space for the color variation to kick in. When I stitch the smaller version I’m going to try stitching the area next to the bands vertically (as I did on the outer border), even though that will be inconsistent with the horizontal streaks on the original rug.
Here’s the rug in the Victorianna. The finished size is about 4 13/16″ by 7 3/8″, stitched over one on 40-count evenweave. It’s a large rug for half scale, but I think it can work in the right setting (which is not this setting!).

It will be months before I finish the smaller version and post the chart, but I’ll update this post when I get around to it.
 Emily is a freelance writer, miniaturist, and adventure game enthusiast.


ABSOLUTELY GORGEOUS! This is an amazing work of art!
Beautiful rug! I can’t wait until you post the chart. I’m going to have to add it to my projects list.
Marilyn
I agree, it’s gorgeous and a work of art!
A very beautiful and detailed work in petit point…your creativity and skill is to be much admired!
That is amazing. I have charted rugs before (although never that complex) so I know the hours of time they take just to chart (as well as how crazy some of the graph-creating programs are), and the months they take to stitch. You have done an incredible job of bringing the original rug down to miniature size. [standing ovation]
I’m curious how you’ve charted rugs, do you follow a similar process? Which program do you use?
I’ve tried several of the online charting programs, including Pic-2-Pat, Pixel-Stitch and My Photo Stitch. A lot of times I’ll run the picture through several different converters to see which does the best job. I usually create my designs in PowerPoint (which is as fancy as I get), and even though the colors and shapes are very clean and I limit the number of colors that the converter can use, the converters *still* add random colors and stitches. I generally go with the best one I can get, and just sort of clean it up. Most recently, I made a pattern with Pixel-Stitch. I have also (and this is truly insane), made patterns in Word by laying transparent shapes over a cross-stitch grid image. You can see an example here: https://thehalfscaleofit.blogspot.com/2019/07/library-books-done.html Brae mentioned a great cross-stitch design program (I believe it’s Patternmaker Pro) that I keep meaning to try, but I haven’t yet.
Wow, that’s very clever! I don’t think I have the artistic prowess to create my own design from scratch.
That’s gorgeous! I’m just completely stunned over how pretty it is. And the amount of work… wow.
I definitely have an Even GREATER appreciation for your vast range of skills and Admiration for your dedication to your Art! Not being an embroiderer (although I once stitched a mini rug back in the 80’s), gives me an Enormous Respect for those who can do it, and do it Right!
Your scaled down rug along with the background information leading towards its realization; has left me in Awe!
Very nice!
I’m sure there’s more than one way to skin a … I mean, convert a full-sized carpet into a petit-point chart, but yours seems a sensible and meticulous way to do it, and certainly successful!
I suppose most people have experienced that bewilderment about “how did I do that?” I suspect that sometimes the things you think won’t be important turn out to be so, or you think, “I’ll remember that for sure!” and you don’t, or even that you are simply caught up in the fervor of the moment and don’t think to stop for mundane things!
Wow! Just plain Wow! I love the rug design to begin with… your process and explanation are very detailed and… way beyond my humble abilities! I am a beginner stitcher, still doing tiny kits, but with dreams of charting my own designs someday. Thank you for the great descriptions!