May 2015: I started the Westville as part of a Greenleaf community build in 2005, and at the time we blogged our progress on the Greenleaf forum. After a few site upgrades the old community blog has become hard to link to and I’m redoing my website anyway, so I decided to move those posts over here and backdate them. Sorry for any weirdness that results!
Here’s my workspace on Day 1 of Project Westville:
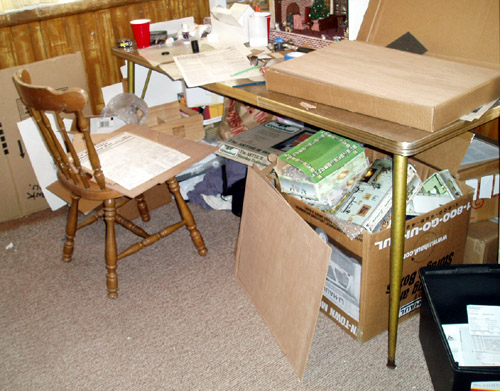
As you can see, there’s not a ton of desk space. My other work table (you can’t see it in this picture) still has the Arthur on it, which isn’t quite done. So I did what any self-respecting miniaturist would do… I used the floor! (This is actually not unusual for me. I do a lot of my work on the floor, and have for years. I guess at some point I’ll have trouble getting up and down there, but for now I still can, and I take advantage of it!)
So, I got to work punching out all the pieces required for Step A. There are A LOT of them, and it turns out not all of them are going to be used in Step A. I hope I don’t lose anything (see messy workspace picture above).
A word of caution – on the left and right walls, be really careful punching out these guys:
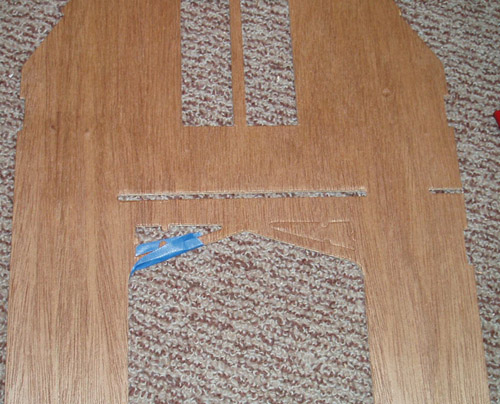
Punching these little triangles out leaves behind the “trim” for the bay windows. I broke two of these trim pieces. They were easy enough to glue back together (hence the masking tape), but if I’d realized they were so fragile I would have been more careful.Although it was difficult, I did manage to dry-fit all the pieces in Step A. It’s kind of hard to do because the house uses a lot of long slots that pieces have to slide into. I haven’t had this experience on other houses (but I haven’t built very complicated houses, either). I’m not sure if it’s common on Greenleaf houses I haven’t built, or if this is related to the house being designed after a life-sized “kit house.” In any case, I hope I’ll be able to get the pieces apart again, because I’m going to need to cut some pieces before I glue them in.
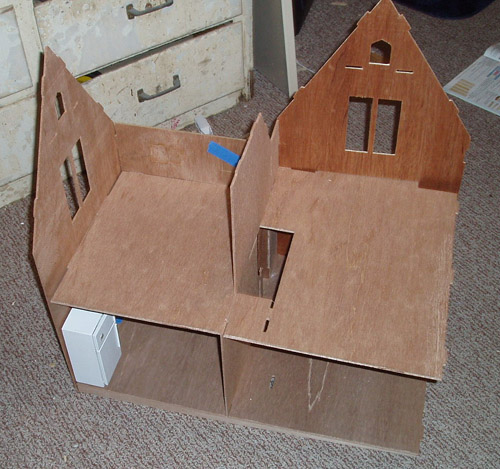
I’m not punching out the little rectangular windows in the left-hand bedroom (although one punched out by mistake as I was dry-fitting and I had to glue it back in). I want to put the daughter’s bed and shelving against that wall, and the windows would be in the way. Those windows have always seemed kind of funny to me, anyway, being so low in the wall.
I’m glad to see that the Realife fridge fits perfectly in the space I’d planned to put it. This is my fridge from a different house, but it’s built from the same kit I’ll be using for the Westville.
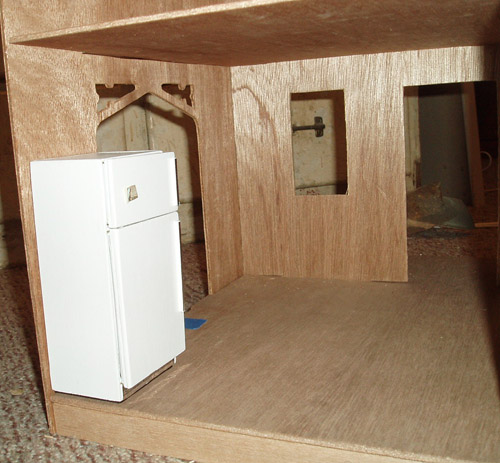
I also need to enlarge the window next to the front door so a Houseworks casement window will fit in there. I know the dimensions the hole has to be, but I want to wait to receive my window from Miniatures.com before I do any cutting, just to make sure.
Another modification I plan to make is to the stairway. I don’t like how on the second floor, the stairway opens up into one of the bedrooms. It’s like this in a lot of dollhouses, but it seems like such an invasion of privacy! Instead, I will close off the area where the banister is supposed to be with walls. (I’m going to do this on the first floor, too, so there won’t be a banister at all.) Instead of the kit stairs, I’m going to use the Houseworks simple stair kit (leaving off the banister). Even though these are Houseworks’ narrowest stairs, they’re about a quarter of an inch wider than the stairs in the kit, so I’ll need to widen the stair hole in the second floor a little bit. And I’m going to have to make a wall (either out of spare plywood, if I have a piece big enough, or of foamcore) to go where the wall with the built-in banister is supposed to go on the first floor. I think I’ll still be able to put in a closet under the stairs.
Since I’m going to have walls instead of railings around the stair hole on the second floor, I’ll be left with a little alcove next to the stairs, that’s part of the right-hand bedroom. I’ve decided to make it into a closet. I might use some of Joann Swanson’s ideas in the picture I scanned for the inside, but will probably use this door instead of doing the door like she did. I measured the space and I think it’ll fit perfectly. [Note: “This door” used to be a link but it’s broken now. I was talking about a Timberbrook closet door, which are no longer made. See this post for how I actually ended up doing the Westville closet.]
I would also like to add disappearing attic stairs, which will require cutting a hole in the attic floor. I have a set of these in my first dollhouse and they’re a nice touch, without taking up a ton of room. I haven’t thought much about the Westville attic yet, but I think it’ll be a real attic, with exposed studs and lots of junk collecting dust.
So, that’s as far as I’ll go today. I am leaving the house dry-fit for now and will hopefully get to the dollhouse store this weekend to buy the stairs. My Miniatures.com order should be here by then, too. Once I have made the modifications to the kitchen window and the stair hole, I’ll feel more confident about gluing these pieces together.
 Emily is a freelance writer, miniaturist, and adventure game enthusiast.


Leave a Reply