The Den of Slack

emilymorganti.com

Page 210 of 239

Plants large and small

As previously mentioned, it took a good three months for my pepper plants to bear fruit. Two months later, they’re finally turning the bright colors you see at the grocery store.


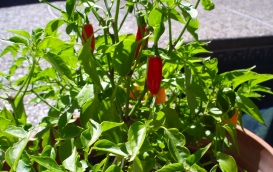
The red serrano peppers are pleasantly spicy. The orange habaneros are a little… less pleasant.

So now the race begins… how many hot pepper recipes can I come up with before we get sick of them?

On the smaller end of the spectrum, my parents were in town this week, and my mom and I put together this 1:24 scale heart-leaf philodendron kit while she was visiting.

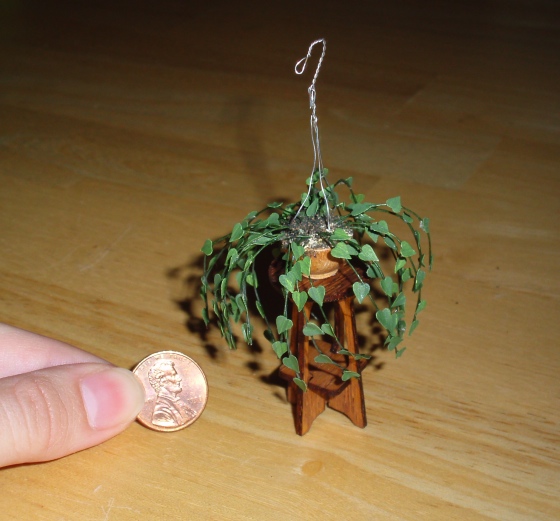
I bought this kit years ago from SDK Miniatures (along with several others) and never got around to putting it together. My mom wants to decorate a half scale conservatory to look like the life-sized greenhouse attached to her house, and this will be the first plant to go inside.

We ran into some issues with the kit—probably related to it being several years old—that resulted in some last-minute substitutions, but I think it turned out pretty nice. The pot broke into a million pieces (okay, five, but they were small!) when I tried to tape it down to the table per the instructions, so I used a little wooden bowl I had that was about the same size. Also the clay that’s supposed to go in the pot was completely hard and even adding water didn’t soften it, so we used wood putty instead, which wasn’t quite as sturdy as the clay would have been, but once everything dried I think it looked pretty good.

She took the plant home with her but I might end up getting another philodendron kit for myself, since it turned out pretty. But in the interest of being thrifty, I’ll build up the ones I already have, first…

Shingles complete (mostly)

The front and back roofs and gable are shingled. I still have to do the porch roof but that requires building the porch first. I also repainted the windows and doors with a Glidden shade named Sandy Feet, and I’m much happier with it!

The shingles turned out surprisingly well, considering they’re made from siding strips I just happened to have lying around. The shades range from blue/gray to black to brown.

Next steps will be applying trim to cover up the corners where the siding doesn’t quite meet and in the eaves to cover gaps between the roof and sides of the house, and then building the porch. And then… it’ll be done! (On the outside, anyway.)

Aw, shingle!

My grandmother used to say “Aw, sugar!” in front of me, instead of swearing. Today I say “Aw, shingle!” because I seriously hurt myself with the glue gun earlier.

I was gluing shingles on my puzzle house and got a huge glop of hot glue on the back of a shingle. I went to throw it out, thinking that was the best way to prevent it from making a mess, and on the way to the trash can the shingle managed to glue itself to my thumb. That glue was HOT! It stuck to my skin and I had to pull it off with a rag. This wasn’t just a little burn. It hurt big time, in all of my fingers and up my arm. (Um, I hope that’s not a sign of nerve damage…) For about two hours I soaked it in cold water which made it feel better, but when I stopped doing that it hurt so bad I thought I would pass out. (I’m not being a crybaby about this… it really, really hurt!) I took Tylenol a few hours ago and it’s finally bearable, but I suspect that’s more due to the drugs than because it’s miraculously healed. Needless to say, my shingling was cut short for the day.

But let’s back up a bit. On Sunday, I glued the roof to the puzzle house. The siding I added messed up the fit a little bit, but in general it fit pretty well.

Originally I had planned to use my leftover Fairfield shingles on this house, but they’ve already been stained and I felt like the color wasn’t quite right. Plus I didn’t know if I’d have enough to cover it all.

I’m trying to keep my costs low on this house, so instead of buying shingles, I thought I’d make my own. I have several bags of Corona Concepts siding strips lying around and decided to use these. Usually staining shingles is really messy, but this was easy—I just stained the individual strips before cutting them down to shingle size. I used some Minwax Ebony stain left over from another project.

Using the Fairfield’s shingles as a guide, I then cut the strips into individual shingles. Each one is about 3/8″ wide. The wood is thin and easy to cut with scissors, although it does tend to crack when I try to cut very narrow pieces for the edges or the angle where the gable meets the roof.

You can buy shingle strips, which are a lot quicker to apply than individual shingles, but I prefer gluing on shingles one by one because you get a nice variety of shades. Here’s as far as I got before the unfortunate glue gun incident.

I’m pretty happy with the look of the shingles. Less so with the trim color. The gray is much more in-your-face than I expected and I just don’t think it looks great, especially compared to the shingles. I feel like it needs to be more subtle. I’m not sure at this point if I should try a different shade of gray, or another color completely.

To be continued once my thumb heals…

« Older posts Newer posts »

© 2025 The Den of Slack

Theme by Anders NorenUp ↑