The Victorianna’s master bathroom is 7.5″ deep, which gives me a nice long wall for the vanity. Even with the tub in place at the front corner I have 5″ to play with. I’m not used to such big bathrooms in dollhouses! (Or real life, for that matter.)

I had been planning to bash a Cassidy Creations store counter kit into a vanity but once I started looking at the pieces, I determined it was too tall and too deep. I found dimensions online for a large double vanity and converted them into half scale, rounding up or down as needed to make use of the wood I had on hand.
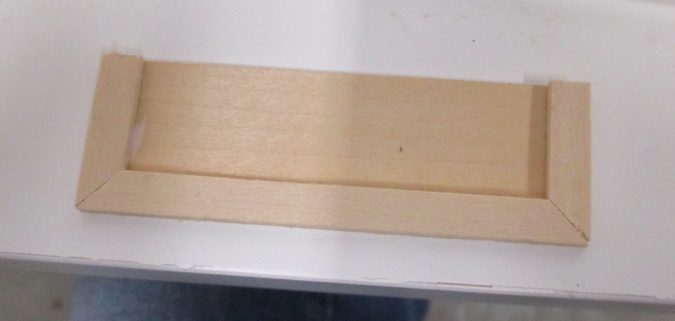
I started with a front and two sides like this. The sides are 1″ deep and the vanity is slightly less than 1.5″ tall.

This bottom piece is one of the base pieces I didn’t use on the sleigh bed. It’s 3″ wide, which makes this the equivalent of a 72″ vanity.

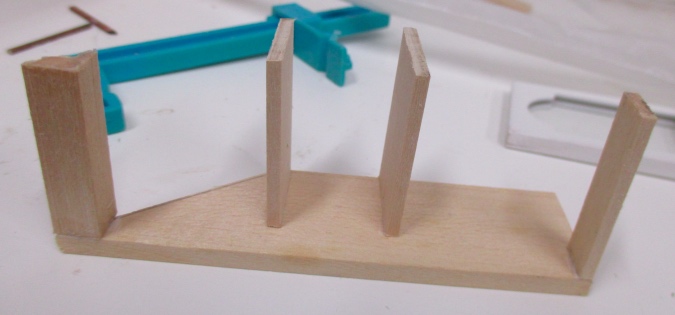
On the inside, I put scraps in the corners and across the back to help keep it square.

I also added a support piece at the top for the countertop to rest on.

The doors are made from two 1:24 shutters, cut in half and then sanded to be equal heights. The height of the shutters is what determined the height of the vanity overall — I prepared those first, and then cut the front piece to fit. I glued drawers between the cabinet doors. (Obviously none of these open!)

I glued on the shutter doors so they lined up with the top edge of the base’s curved corner, and then added cove molding to dress it up a little.

The counter is made from 1″ basswood. My options in the scrap drawer were either a very thin piece or a very thick piece, and I opted for the thin one for easier cutting of the sink holes. The piece was a little warped, so I added strip wood around the edges of the underside to help straighten it out and also make the counter look more substantial.
I’m using 3D printed sinks from MiniEtchers. To cut the holes, I figured out the rough size by measuring the edges of the basin, cut a rough hole, and then sanded it to make it bigger. The sinks have a lip so it’s okay that the holes are jagged.
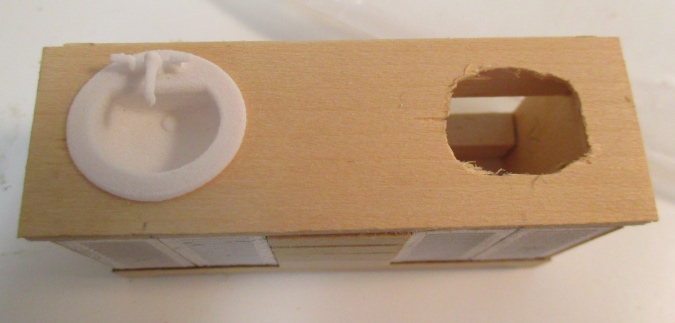
An unintended benefit of the strip wood underneath the counter is that I cut the fronts and outside edges of the holes right up against the strip wood, so the two sinks are aligned and equally spaced from the edges without having to do a lot of measuring.

The counter is 1″ deep and the vanity is also 1″ deep, plus the depth of the doors and drawers. Basswood doesn’t come in 1-inch-plus-a-little-bit sizes, so using 1″ for both was really the only way to do this without cutting down a much bigger piece. I made the counter slightly wider than the sink so it can overhang on the sides. A 1/4″ deep backsplash sits behind the counter to make up the extra space at the back.

This way the counter hangs over slightly at the front.

Moving on to the closet. With the master bedroom closet on the other side of the wall, I wasn’t planning to put one in the bathroom too. But when I wallpapered this wall, I didn’t bring the paper back far enough on the tab to meet up with the ceiling. I couldn’t think of a neat way to fix that, so… let’s make another closet!

This dollhouse already has closets with louvered doors in the master bedroom and the downstairs bathroom, plus the vanity has louvered doors… there’s such a thing as too many louvers! I looked at photos of real bathrooms and saw several linen closet doors with a panel on the bottom and glass at the top. That reminded me of the broken Majestic Mansions door I’ve been holding on to.

I cut side pieces to form a closet enclosure. It took a few tries to get the angle right — since the roof isn’t glued on yet, everything about this closet is kind of shaky and imprecise. (This is one of those projects where I would have saved a lot of time if I’d just found a less complicated way to fix the original mistake…)

I used a piece of 1:12 crown molding to form the top of the closet, so I wouldn’t have to cut a piece at an angle. After a few failed attempts to glue together the top, bottom, and sides, I added shelves to help hold it together. The top and bottom of the closet are flush with the front. The shelves are flush with the back, leaving enough room for the door to sit in front of them.
After seeing where the shelves landed against the wall and ceiling, I scooted the top one down and added another shelf above it. This one had to be tapered at the back to accommodate the sloped ceiling. The middle shelf lines up with where the back wall and ceiling meet, and the bottom shelf falls just below the window. I’m leaving the bottom open for a hamper.

Here’s how it looks with the door on. I’m glad I added the second shelf. One lone shelf looked funny through the window.

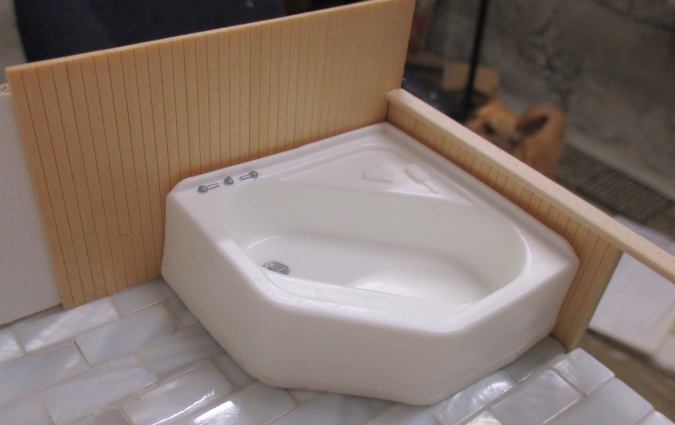
Once I got the closet and vanity in place I realized the vanity was going to come very close to the tub surround, which were both supposed to be marble. That seemed weird — like it should be all one piece of marble instead of two separate pieces — but if I ran one piece along the wall to serve as both the tub surround and the vanity backsplash, then the backsplash wouldn’t fill in that gap at the back of the countertop. Also I didn’t really like the idea of so much marble when I’m not super confident about my ability to make the marble look good.

Oh, and despite my best efforts, the closet isn’t square (or maybe it is and the wall isn’t square). When the left side is flush against the wall, the right side has a big gap at the back.

I could glue it in so it’s snug on the right and use trim to cover up the gap on the left, but then the top might look weird (not hitting the ceiling nicely).

I can solve both of these problems with beadboard. This is scribed wood from Northeastern Lumber. When I set the closet so the left side is flush against the wall, then slide the beadboard through the gap on the right side and all the way in, it butts up against the left side and hides that the closet is off kilter.

I glued two pieces of beadboard together to make the short piece behind the tub. This chair rail trim hooks over the top.
Here’s the back view. This is a weird area because there should be a wall here — in real life you would never see the back of the surround — but it’s right in your face when you look into the room, so it needs to look good. There was something funny about seeing the back side of a marble slab. This will look neater and make more sense. (I am still planning to do marble for the countertop and inside the shower.)

I’ll paint the beadboard and closet with the same trim color I’m using throughout the house. I’m also going to change the wallpaper in here — thanks to the beadboard I only need enough paper to cover the top half of the walls, and I have scraps of the pink I’m using in the rest of the house that will fit. (Yay!) The bright white turned out to be a bad choice anyway… the beige trim looked pretty dingy next to it.

 Emily is a freelance writer, miniaturist, and adventure game enthusiast.


Wow!!! So many ideas…tried to pin a few but wow!!! Great article!
Great problem solving! It all looks well planned and orchestrated!